
Need to switch to 32-bit on a Mac? See below.
 |
| Switch to 32-bit! Click to enlarge |
When making a GIF, your aim is to keep the GIF as short as possible, whilst including everything you want to be seen. The limit for GIFs on Tumblr is 1.75MB.
Step one: When your video, in file format .MOV (you can convert clips at clipconverter), it is ready to be imported into Photoshop. To do this, go to file>import>video frames to layers. The window labelled 2. on the picture below will come up.

Step two: Click selected range only, then hold down shift as you drag the slider to where you want to GIF. The part you select will show up grey. You can also limit to every 2 frames to make the GIF smaller, but I don't recommend it as it affects the smoothness of the GIF.
Step three: At the bottom of the screen you should see the animation toolbar. If not, go to window, then click animation. Delete all the frames you don't want to appear from the animation toolbar.

The timing should already be set. For most videos it is either 0.03 or 0.04 seconds per frame.
Optional—Adding text:
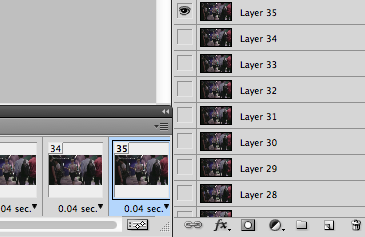 First, click the final frame in your animation toolbar, then click the layer with the eye icon next to it.
 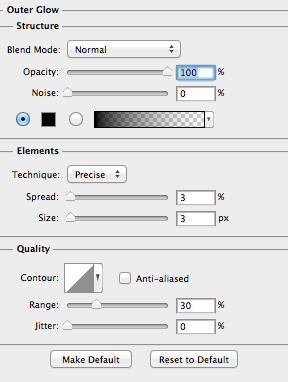 Below where your layers are shown, click the little fx icon. Click outer glow. I suggest the settings shown at the right, to get the perfect glow! (click to enlarge the picture!)
The final step is to click the button, next to where it says "unify", with the little icon with an f on it. This will unify the effect you added to the text to every frame of the GIF.
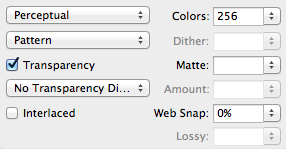 Step four: Go to file, then save for Web & Devices. A window will show up, where you need to select GIF in the top right. The best quality GIF is shown to the left, and if possible, try to keep your settings at that level! If you are creating a full width GIF for Tumblr, it should be 500 pixels wide. If you are putting two GIFs side by side, they should be 250 pixels wide, and if you are planning on putting three GIFs side by side, they should be 166 pixels wide. Remember, the GIF has to be under 1.75MB large to work on Tumblr!
If you need to make a GIF smaller, change the size, amount of colours, or increase the web snap. It may seem hard from this tutorial, but after a little practice, it's super easy!

I hope you enjoyed this tutorial, thanks for reading!
No comments :
Post a Comment